Thursday, January 17, 2013

Making Phylogenetic Tree Figures


Making phylogenetic trees takes many steps and requires the use of several online resources.

iTOL, or the Interactive Tree of Life, will automatically generate a tree of life based on NCBI identifiers. To use iTOL you will need the NCBI scientific name (including proper capitalization); just replace the space with an underscore. If you aren't sure about a species scientific name, you can search Ensembl, NBCI, or even Wikipedia.

Here is what I used to look at amniote evolution.

Mus_musculus
Homo_sapiens
Gallus_gallus
Taeniopygia_guttata
Alligator_mississippiensis
Xenopus_laevis
Trachemys_scripta
Pelodiscus_sinensis
Anolis_carolinensis
Danio_rerio


HOW DO I GENERATE THE TREE?

Enter in the scientific names and click generate tree. iTOL has many features, which you can explore. I didn't particularly like their user interface, so I simply used them to give me the Newick text.  Newick text is just a way to represent trees in a language computers can easily 'read.'


After you generate the tree, you will be given Newick text, that establishes the tree structure. You can use the taxonomy IDS or scientific names. If the internal nodes are expanded, you will have a very large and detailed tree.

 
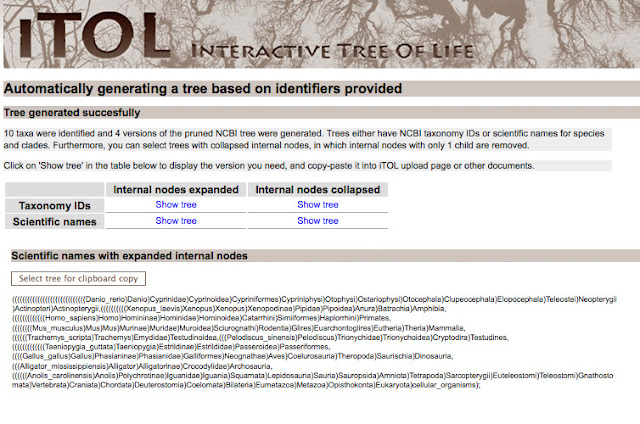
For my purposes, I wanted to a tree with the internal nodes collapsed. For making a publication quality figure, it's less crowded.
 
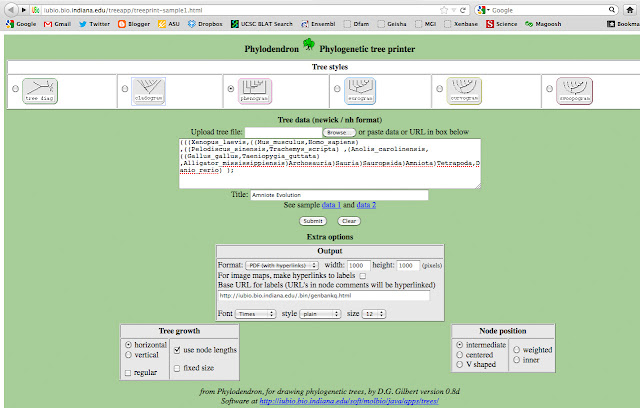
Next, I copied the text and pasted the following text into University of Indiana's Phlyodendron.  

(((Xenopus_laevis,((Mus_musculus,Homo_sapiens) ,((Pelodiscus_sinensis,Trachemys_scripta) ,(Anolis_carolinensis,((Gallus_gallus,Taeniopygia_guttata) ,Alligator_mississippiensis)Arch)Sauria)Saurop)Amniota)Tetra,Danio_rerio) );

The original text was actually:
(((Xenopus_laevis,((Mus_musculus,Homo_sapiens)Euarchontoglires,((Pelodiscus_sinensis,Trachemys_scripta)Cryptodira,(Anolis_carolinensis,((Gallus_gallus,Taeniopygia_guttata)Neognathae,Alligator_mississippiensis)
Archosauria)Sauria)Sauropsida)Amniota)Tetrapoda,Danio_rerio)Euteleostomi);

But I replaced Euteleostomi, Neognathae, Cryptodira, Euarchontoglires with spaces. I also abbreviated a few names, so they didn't intersect with the lines. I want my final figure to look clean. Next, I chose to output a phenogram tree.


 That will generate a PDF file, that looks like this:


HOW DO I MAKE IT LOOK GOOD?

Now, I use Photoshop to spruce up the image. First, I make the image I want to create a time line on the bottom and check the dates of each node. In general, I will compact the vertical lines to make it tighter. This is where a bit of awareness in image composition comes in handy. You don't want your image too look too spaced out or too crowded. Choose a color scheme that is not too jarring or too pale. The image composition should not distract from the information you are trying to convey!

USE LAYERS
When you begin adding features to your Photoshop file, you will want to make a new layer for each item, name it and keep track of what layer you are working on at all times. Keep a separate layer for the tree, the time scale, the boxes, each name, etc. You will thank me later! Save it as a .psd file. 

SAVE MANY,  SAVE OFTEN 
I also like to save different versions every time I make a radical change. v_1, v_2, v_3. There are countless times I have had to use a backup file.


I recommend using Illustrator if you want a high-quality publication-ready figure. The use of vectors in your images will allow the image to still look great at different sizes. You can open your .psd Photoshop file in Illustrator. My general design was based on Sudhir Kumar's TimeTrees. It's a wonderful site, accompanied by a wonderful book and I highly recommend checking it out.

VECTORS ARE BETTER
If you use Adobe Illustrator, you can save your image as a PDF file. Try zooming in and out of your image. I am not going to give a lecture on what vectors are (Google it!), but with vectors, instead of bmps, the image will still look great at many scales (instead of pixelated). This is especially true for the text, which often becomes distorted.

KNOW YOUR FILE SIZE REQUIREMENTS
If you are making the figure for a publication, you will need to consult their graphic or artwork guide. There are  usually 3 sizes you can make your image: 

1) Single column width in a double column paper
2) One and a half width
3) Full page width

For each of these sizes, you should make sure the image resolution is up to par. I like to have at least 300 resolution and a large document size. In general, if an image looks great when it's big, it will continue to look great as you shrink it down. The same is not true if you do it the other way around.


While each publication company has different requirements, some general sizes are:

DESIRED SIZE                    SIZE        DPI
Single column width        - 90 mm      ~ 3500
One and half page width  - 140 mm    ~ 5500
Full page width                - 190 mm    ~ 7500


WHAT DATES SHOULD I USE? 

There is, of course, always controversy in obtaining accurate evolutionary dates. They are estimates, at best, and having several sources to base your estimates off of is the best strategy. I love using the Time Tree program. It pulls in many sources indicating species molecular estimates. You can click on each paper and decide on what date you want to use for your tree. 


Good luck with your tree making!

Monday, January 14, 2013

Making Primers, Pt I

Making primers is a long process. In Part I, I am just going to cover how to order the initial oligos.

If you are looking de novo for orthologue (gene equivalents) in another species, you may have to do some BLASTS to try to find them, including BLASTs for proteins, mRNA or highly conserved regions (like a promoter), depending on the amount of time diverged.

To begin, you have to search for the genes you want and save the sequence to a file. If you use Ensembl, you can search for a gene in a species and use the gene browser to visualize the gene structure. For example, I searched for Pax6 in the frog Xenopus. I can see right away that there are two isoforms of this gene.


So I know that the gene is spliced alternatively in two forms, which may have tissue specificity or functional importance. One isoform may be predominantly expressed, while another is found in low levels. Ideally, I want to capture them both. I will choose exons that are common to them both. For Pax6, the last 2 exons appear to be similiar enough. I want to export the exon sequence for two exons from Ensembl.


I want my oligo to span 2 exons ideally, such that the sequence spans an intron on either side. After each > is an exon. I find the 2 exons I want to use and copy/paste them into Primer3Plus.

I paste the exons into a text file and begin looking for a a good stretch, that spans introns, has a good GC content, and will give an appropriate product size. 

 >ENSXETG00000008175:ENSXETT00000017931 ENSXETE00000100940 exon1:KNOWN_protein_coding
ATGTCCCTAGGTCACAGCGGAGTCAATCAACTCGGGGGAGTGTTTGTGAACGGCCGACCC
CTGCCCGACTCCACCAGGCAGAAGATCGTGGAACTGGCGCACAGCGGCGCACGTCCCTGC
GACATTTCTCGGATTCTGCAG
>ENSXETG00000008175:ENSXETT00000017931 ENSXETE00000100931 exon2:KNOWN_protein_coding
GTGTCCAACGGCTGTGTGAGTAAGATCTTAGGGAGATATTACGAGACTGGATCGATCCGA
CCCAGAGCAATCGGTGGCAGCAAACCCAGAGTAGCCACCCCAGAAGTGGTTAGCAAGATA
GCCCAGTATAAAAGAGAGTGCCCTTCCATCTTTGCATGGGAAATCCGAGACAGGTTGCTA
TCTGAGGGAGTCTGTACCAACGACAATATCCCCAGT
>ENSXETG00000008175:ENSXETT00000017931 ENSXETE00000100932 exon3:KNOWN_protein_coding
GTGTCATCAATAAACCGAGTGCTGCGCAACCTGGCGAGCGAAAAGCAACAGATGGGCGCC
GATGGCATGTACGACAAGCTCAGGATGCTGAATGGGCAAACTGGGACCTGGGGGACCCGG
CCAGGGTGGTACCCCGGCACCTCGGTACCTGGCCAGCCAGCACAGG
>ENSXETG00000008175:ENSXETT00000017931 ENSXETE00000100941 exon4:KNOWN_protein_coding
ACGGGTGTCAGCCGCAAGAAGGAGGAGGAGGAGGAGAAAACACAAACTCAATCAGCTCCA
ATGGCGAAGACTCAGACGAGGCCCAAATGAGGCTTCAGCTGAAGAGAAAATTACAAAGGA
ACAGAACATCTTTTACCCAGGAACAAATAGAGGCCCTAGAAAAAG
>ENSXETG00000008175:ENSXETT00000017931 ENSXETE00000100934 exon5:KNOWN_protein_coding
AATTTGAACGAACACATTACCCCGACGTGTTTGCCAGGGAAAGATTAGCTGCCAAAATCG
ACCTGCCAGAAGCAAGAATACAG
>ENSXETG00000008175:ENSXETT00000017931 ENSXETE00000100935 exon6:KNOWN_protein_coding
GTATGGTTCTCCAACAGAAGAGCAAAATGGAGAAGGGAGGAAAAACTTCGAAACCAGAGA
AGGCAGGCCAGTAACACACCCAGCCACATTCCCATTAGCAGTAGTTTCAGTACGAGCGTC
TACCAGCCAATCCCACAGCCTACCACACCAG
>ENSXETG00000008175:ENSXETT00000017931 ENSXETE00000100942 exon7:KNOWN_protein_coding
TGTCCTCTTTCACATCGGGTTCCATGCTGGGCAGAACGGACACAGCATTGACAAACTCCT
ACAGTGCGCTGCCACCTATGCCTAGTTTTACAATGGGCAACAACCTACCTATGCAA
>ENSXETG00000008175:ENSXETT00000017931 ENSXETE00000316156 exon8:KNOWN_protein_coding
CCCCCCCCCCCCCCCACACACACACACACCTATCTTTTCCTGAGTTCCAATG
>ENSXETG00000008175:ENSXETT00000017931 ENSXETE00000408902 exon9:KNOWN_protein_coding
CAATGTGCCCAAACACTACAACGTATGATCCTTATGGACCCTTTATAAGGAACCCTAGGC
ATAGGCATGGAAACTGTCAGCCACAAAGTTCCAAAGGGACAAACCTAAAAT
>ENSXETG00000008175:ENSXETT00000017931 ENSXETE00000100943 exon10:KNOWN_protein_coding
GTCTCATTTCCCCTGGAGTGTCAGTCCCAGTTCAAGTACCCGGCAGTGAACCTGACATGT
CTCAGTACTGGCCAAGACTACAGTAA


I use Primer3Plus. The only settings I change is the product size range and the GC content. I want a product size that is ideally between 600 - 1000 base pairs. Under 400 is too short.


If you want to see how many nucleotides are in your sequence, you can go to LetterCounter.net and paste the text in there. This should give you an idea of what your product size will be.

Now that I have the exons sequence from 2 exons, there are several places I can go to generate primers. I want to have one primer on Exon 4 and the second on Exon 7. I copy and paste this sequence into Primer3Plus.
Primer Set 1 - Exon 4/5/6/7
Product Size - 531 bp

ACGGGTGTCAGCCGCAAGAAGGAGGAGGAGGAGGAGAAAACACAAACTCAATCAGCTC
CAATGGCGAAGACTCAGACGAGGCCCAAATGAGGCTTCAGCTGAAGAGAAAATTACAAA
GGAACAGAACATCTTTTACCCAGGAACAAATAGAGGCCCTAGAAAAAGAATTTGAACGAA
CACATTACCCCGACGTGTTTGCCAGGGAAAGATTAGCTGCCAAAATCGACCTGCCAGAAG
CAAGAATACAGGTATGGTTCTCCAACAGAAGAGCAAAATGGAGAAGGGAGGAAAAACTT
CGAAACCAGAGAAGGCAGGCCAGTAACACACCCAGCCACATTCCCATTAGCAGTAGTTTC
AGTACGAGCGTCTACCAGCCAATCCCACAGCCTACCACACCAGTGTCCTCTTTCACATCG
GGTTCCATGCTGGGCAGAACGGACACAGCATTGACAAACTCCTACAGTGCGCTGCCACC
TATGCCTAGTTTTACAATGGGCAACAACCTACCTATGCAA


The first (forward) primer is on Exon 4, as I wanted. I can see from the second (reverse primer in yellow) may not be on Exon 7, but Exon 6.

While Primer3Plus will highlight the sequence for you, in the box below with the Pair the sequence will be reversed in order and reverse complimented. For instance, in the picture you can see Right Primer 3 is GAACCCGATGTGAAAGAGGA, even though the highlighted sequence is TCCTCTTTC ACATCGGGTT C.

In order to double check I will need to reverse compliment the sequence and search in my Ensembl text file to see what Exon its on. You can maybe do this in your head, but what I do is list the nucleodtides and work backwards. First I list the reverse compliment to the nucleotides. Then I reverse the whole order.

1) TCCTCTTTC  ACATCGGGTT  C  (original primer seqeunce)
2) AGGAGAAAG  TGTAGCCCAA G  (reverse compliment to original)
3) G AACCCGATGT GAAAGAGGA   (flipped sequence order)

Next, I take this sequence and search in the Ensembl text.
1) TCCTCTTTC ACATCGGGTT C

I do a search for ACATCGGG and I find that the primer is indeed on Exon 7.

Next I  make another set with a primer on Exon 5 and Exon 10. This will give me a total of 4 primers, that I can use to mix and match (should one of the primers prove to be a poor choice).

Primer Set 2 - Exon 5/6/7/8/9/10
Product Size - 549
AATTTGAACGAACACATTACCCCGACGTGTTTGCCAGGGAAAGATTAGCTGCCAAAATCGA
CCTGCCAGAAGCAAGAATACAGGTATGGTTCTCCAACAGAAGAGCAAAATGGAGAAGGGA
GGAAAAACTTCGAAACCAGAGAAGGCAGGCCAGTAACACACCCAGCCACATTCCCATTAG
CAGTAGTTTCAGTACGAGCGTCTACCAGCCAATCCCACAGCCTACCACACCAGTGTCCTCT
TTCACATCGGGTTCCATGCTGGGCAGAACGGACACAGCATTGACAAACTCCTACAGTGCG
CTGCCACCTATGCCTAGTTTTACAATGGGCAACAACCTACCTATGCAACCCCCCCCCCCCC
CCACACACACACACACCTATCTTTTCCTGAGTTCCAATGCAATGTGCCCAAACACTACAA
CTATGATCCTTATGGACCCTTTATAAGGAACCCTAGGCATAGGCATGGAAACTGTCAGCCA
CAAAGTTCCAAAGGGACAAACCTAAAATGTCTCATTTCCCCTGGAGTGTCAGTCCCAGTT
CAAGTACCCGGCAGTGAACCTGACATGTCTCAGTACTGGCCAAGACTACAGTAA


Next, I make a spreadsheet for the primers to keep track of what I order.


Next, I want to check to see what my PCR product should be. I enter in the sequence and my forward and reverse primer into a PCR Test, which is online at http://www.bioinformatics.org.


The results tell me the product size should be 516 bp, well within my desired range.

Now that I have the primer sets designed, I know the final product size is optimal, and that the GC content is above at least 45%, I can order them from a company. We use IDT, Integrated DNA technologies to order our primers.


From the IDT main ordering menu, I chose the Custom Synthesis -> Custom DNA oligos. On the order page, I enter in the sequences. All the default settings are fine.